
Being European I grew up eating sauerkraut. My grandmother, bless her heart, was the one who supplied us with raw fermented cabbage. She made all manner of interesting pickles, including sauerkraut. We mostly ate it cooked, as a soup garnished with sour cream or as a side dish with pork. Both absolutely delicious, and while there is nutrition in cooked sauerkraut, as we all know, eating raw fermented cabbage is far better for one’s health, which is why I’ve decided to make it.
Health Benefits of Sauerkraut
A single serving of naturally fermented sauerkraut will not only restore your gut flora, it will give your body a bigger health boost than any probiotic drink or store-bought supplement. Being so probiotic rich, fermented foods are more easily digested. The fermentation process also increases certain nutrients, for example, sauerkraut has twenty times the bio-available amount of Vitamin C of raw cabbage. While fermented foods contain a high level of salt, therefore, best eaten as a condiment, the fermentation process cuts the sugar content of the food dramatically. All good news! Overall, fermented foods are a great support to immune function as they increase digestive enzymes, lactic acid, vitamins and omega-3 fatty acids, all of which aid in fighting off harmful bacteria in the body. For more specific health benefits of sauerkraut, you may like to visit Organic Facts.
What About Goitrogens?
In my reading about raw sauerkraut the only point to be aware of is that cruciferous vegetables, such as cabbage, contain high levels of goitrogens. These are substances that inhibit the uptake of iodine in the thyroid gland. This effect can be overcome by an increased dietary intake of iodine if the quantity consumed is only small. You can find a list of 22 iodine rich foods here. Cooking cabbage reduces the effect considerably, but as sauerkraut is a raw food it is not advisable to consume large amounts, particularly if your thyroid is compromised. If this is the case for you, you can add iodine based foods such as wakame or kelp to your sauerkraut recipe.
Making Raw Sauerkraut
Now, let’s get to how to make your sauerkraut. The short version is you shred the veg, add salt, squeeze the lot with your hands for five minutes to get a good puddle of brine, put it a sealed jar ensuring the contents are weighed down so the cabbage is completely immersed in the brine, pop it in a not-too-hot, not-too-cool spot, taste it occasionally, and wait from 1 week to 5 weeks depending on how tangy and crunchy you like your raw sauerkraut. Easy peasy! Now here’s the long version:
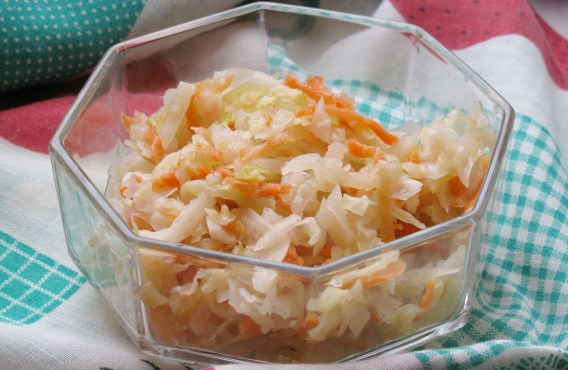
Naturally Fermented Sauerkraut
You Will Need:
- 2 clean quart size wide-mouth glass jars with screw top lids
- 2 clean small jars with no lids that will fit easily into the large jars
- Baking paper
Ingredients:
- 1 medium head of green or red cabbage weighing 2½-3 lbs or 1-1½ kilos
- 2 carrots
- 2 red apples – makes it sweet
- 2-3 cloves of garlic
- 1 tablespoon of salt which contains no additives
- Optional additions: a few peppercorns, a bay leaf, sprinkling of caraway seeds
Method:
- Discard the outer limp leaves of the cabbage. Remove and keep the next good layer for later use, then remove the core and slice the cabbage into thin ribbons. Peel and grate the carrots and apples, and crush the garlic. You will need 1¾ pounds or 800 grams of shredded vegetable in total. This is important as it corresponds exactly to the amount of salt you will be using.
- Place the vegetables in a large bowl adding any optional flavourings.
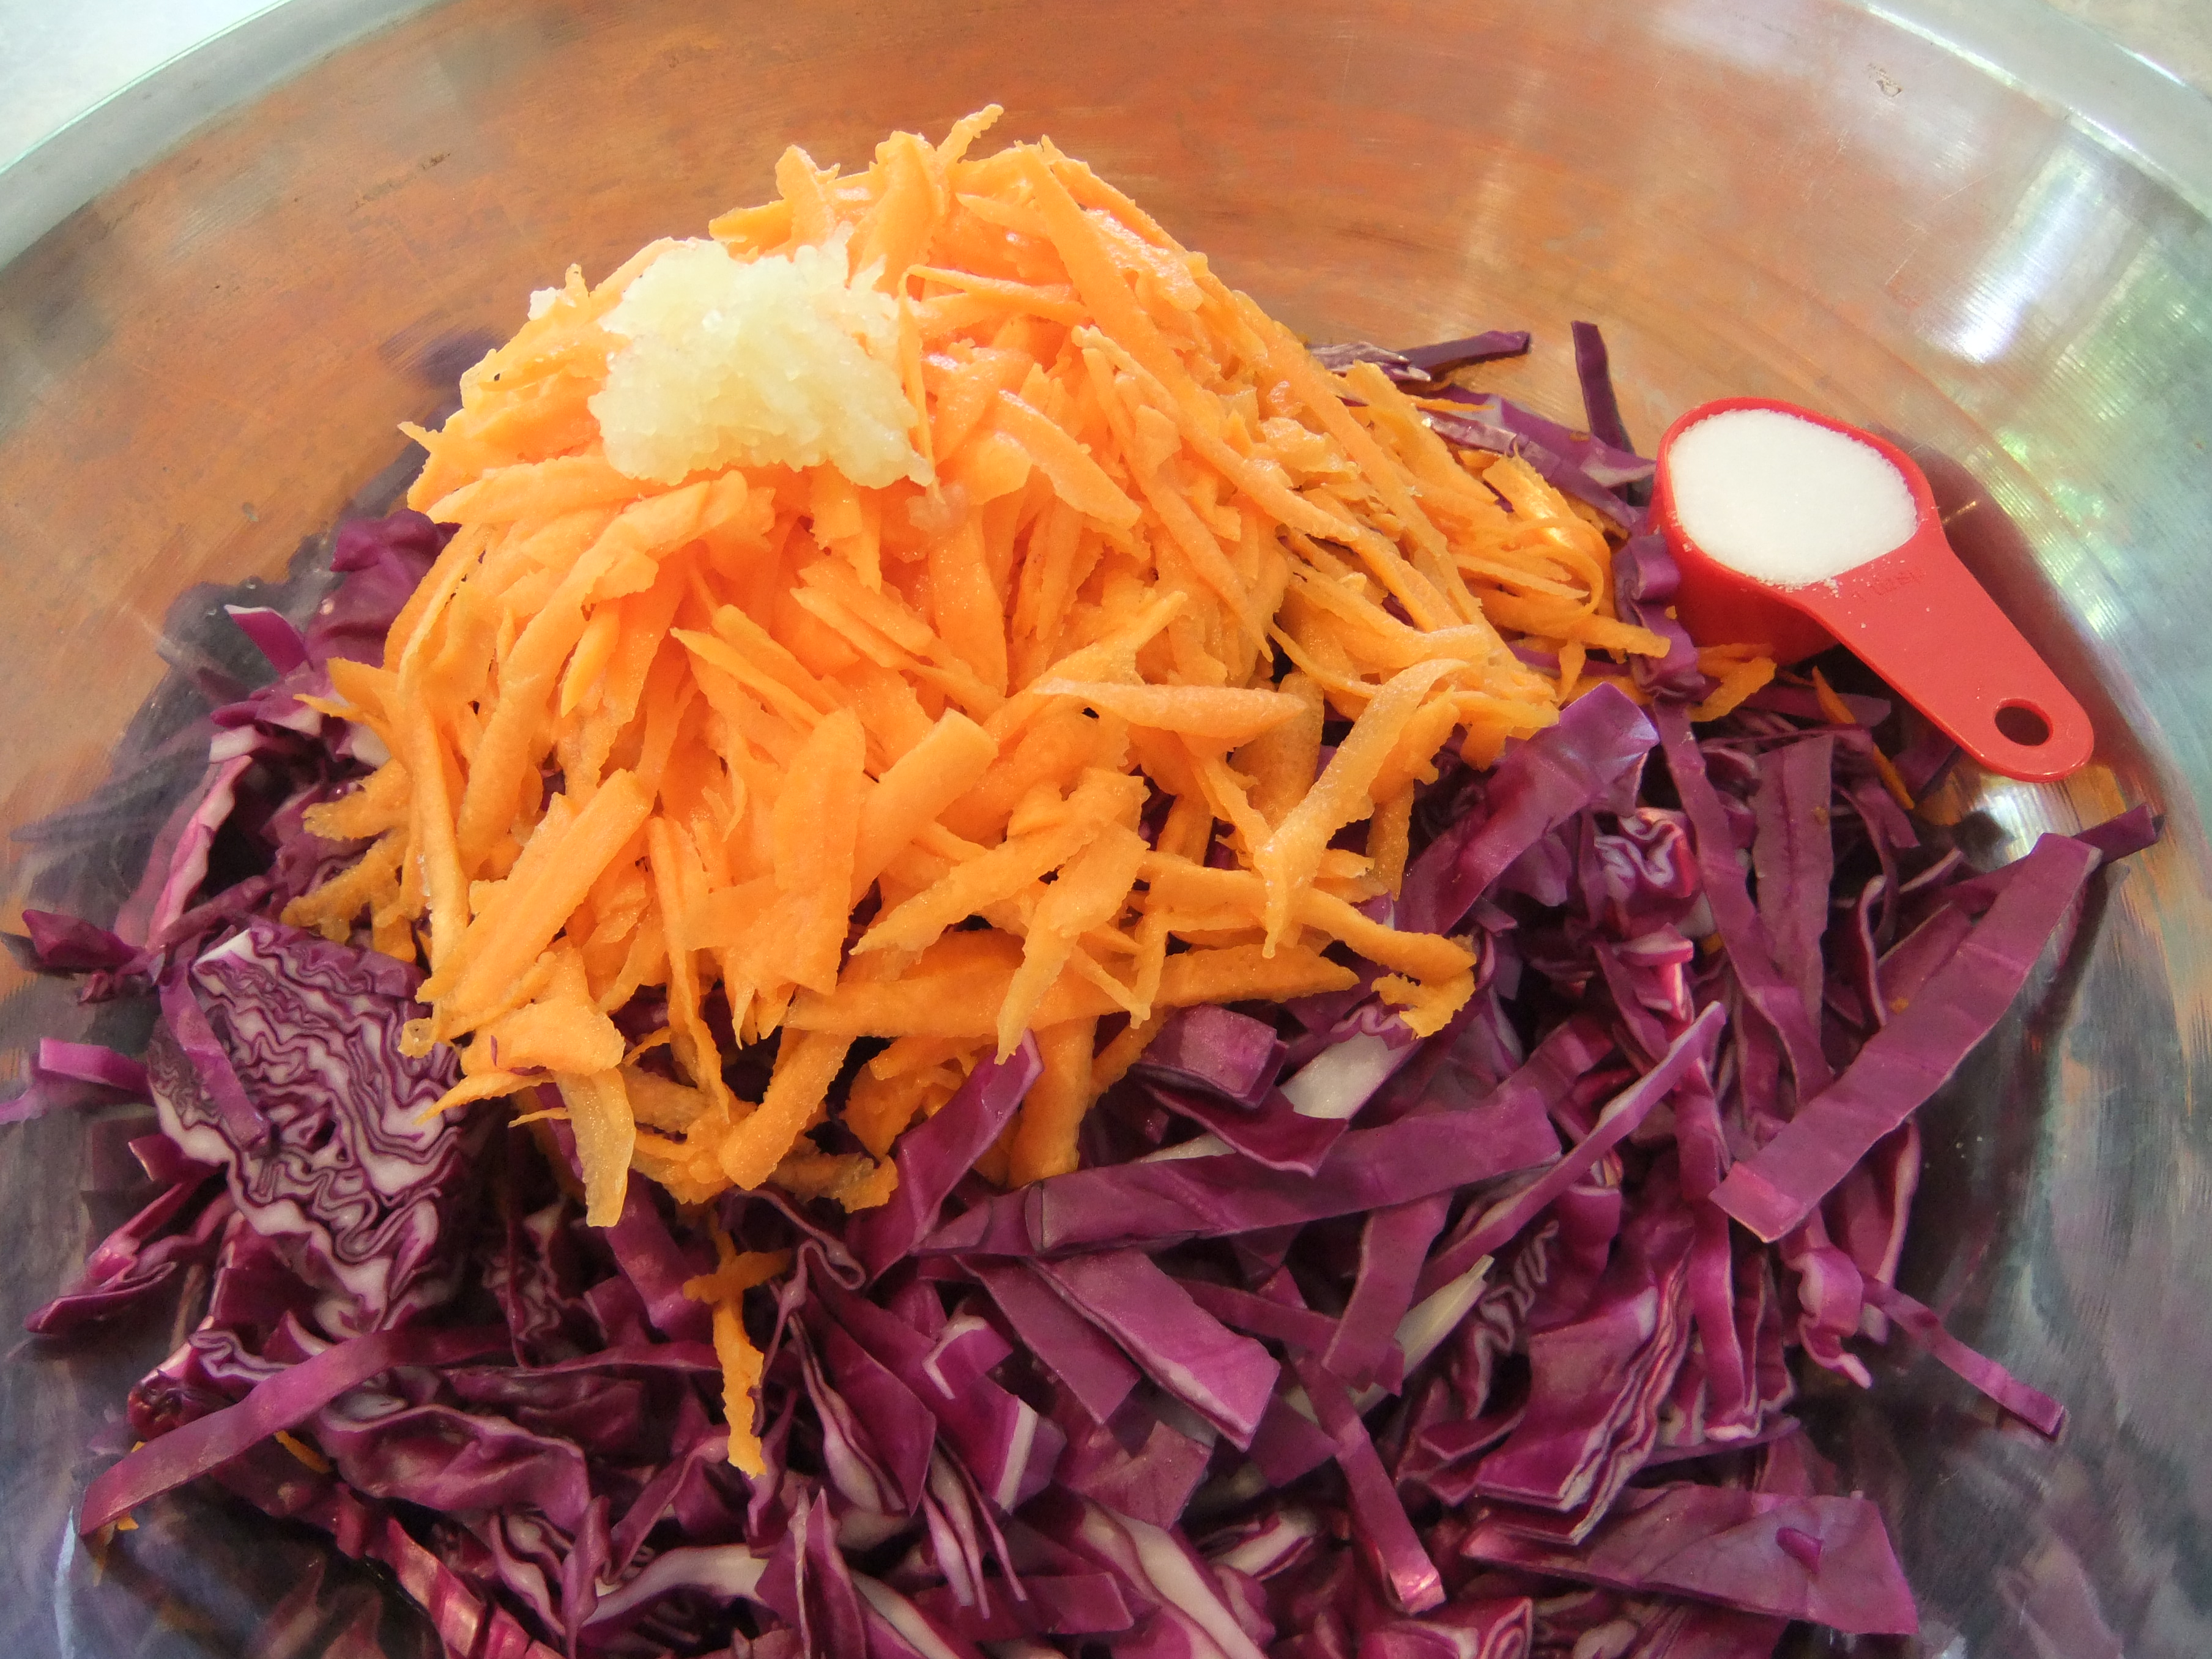
- Sprinkle the mix with salt then squeeze the vegetables really well with your hands for about 5 minutes until you see brine forming. Cover the bowl with a towel, leave it for a few hours and repeat the process. By this time, you should have a good pool of brine.

- Now it’s time to pack it into your jars. Push the mix down firmly with your fist so that the vegetables are fully submerged in the brine.
- Fold the baking paper about four times to the size of the bottom of the jar, place it on top of the vegetables and then put in the small jar, bottom down. You want the small jar to stick out of the top a little so that when you screw down the lid it pushes the vegetables down even further and ensures they are completely covered with brine. If you don’t want to use the small jars, you can push the vegetables down by filling the large jar with the best outer leaves of the cabbage until the sauerkraut is packed tight and covered with juice.
The Fermentation Process
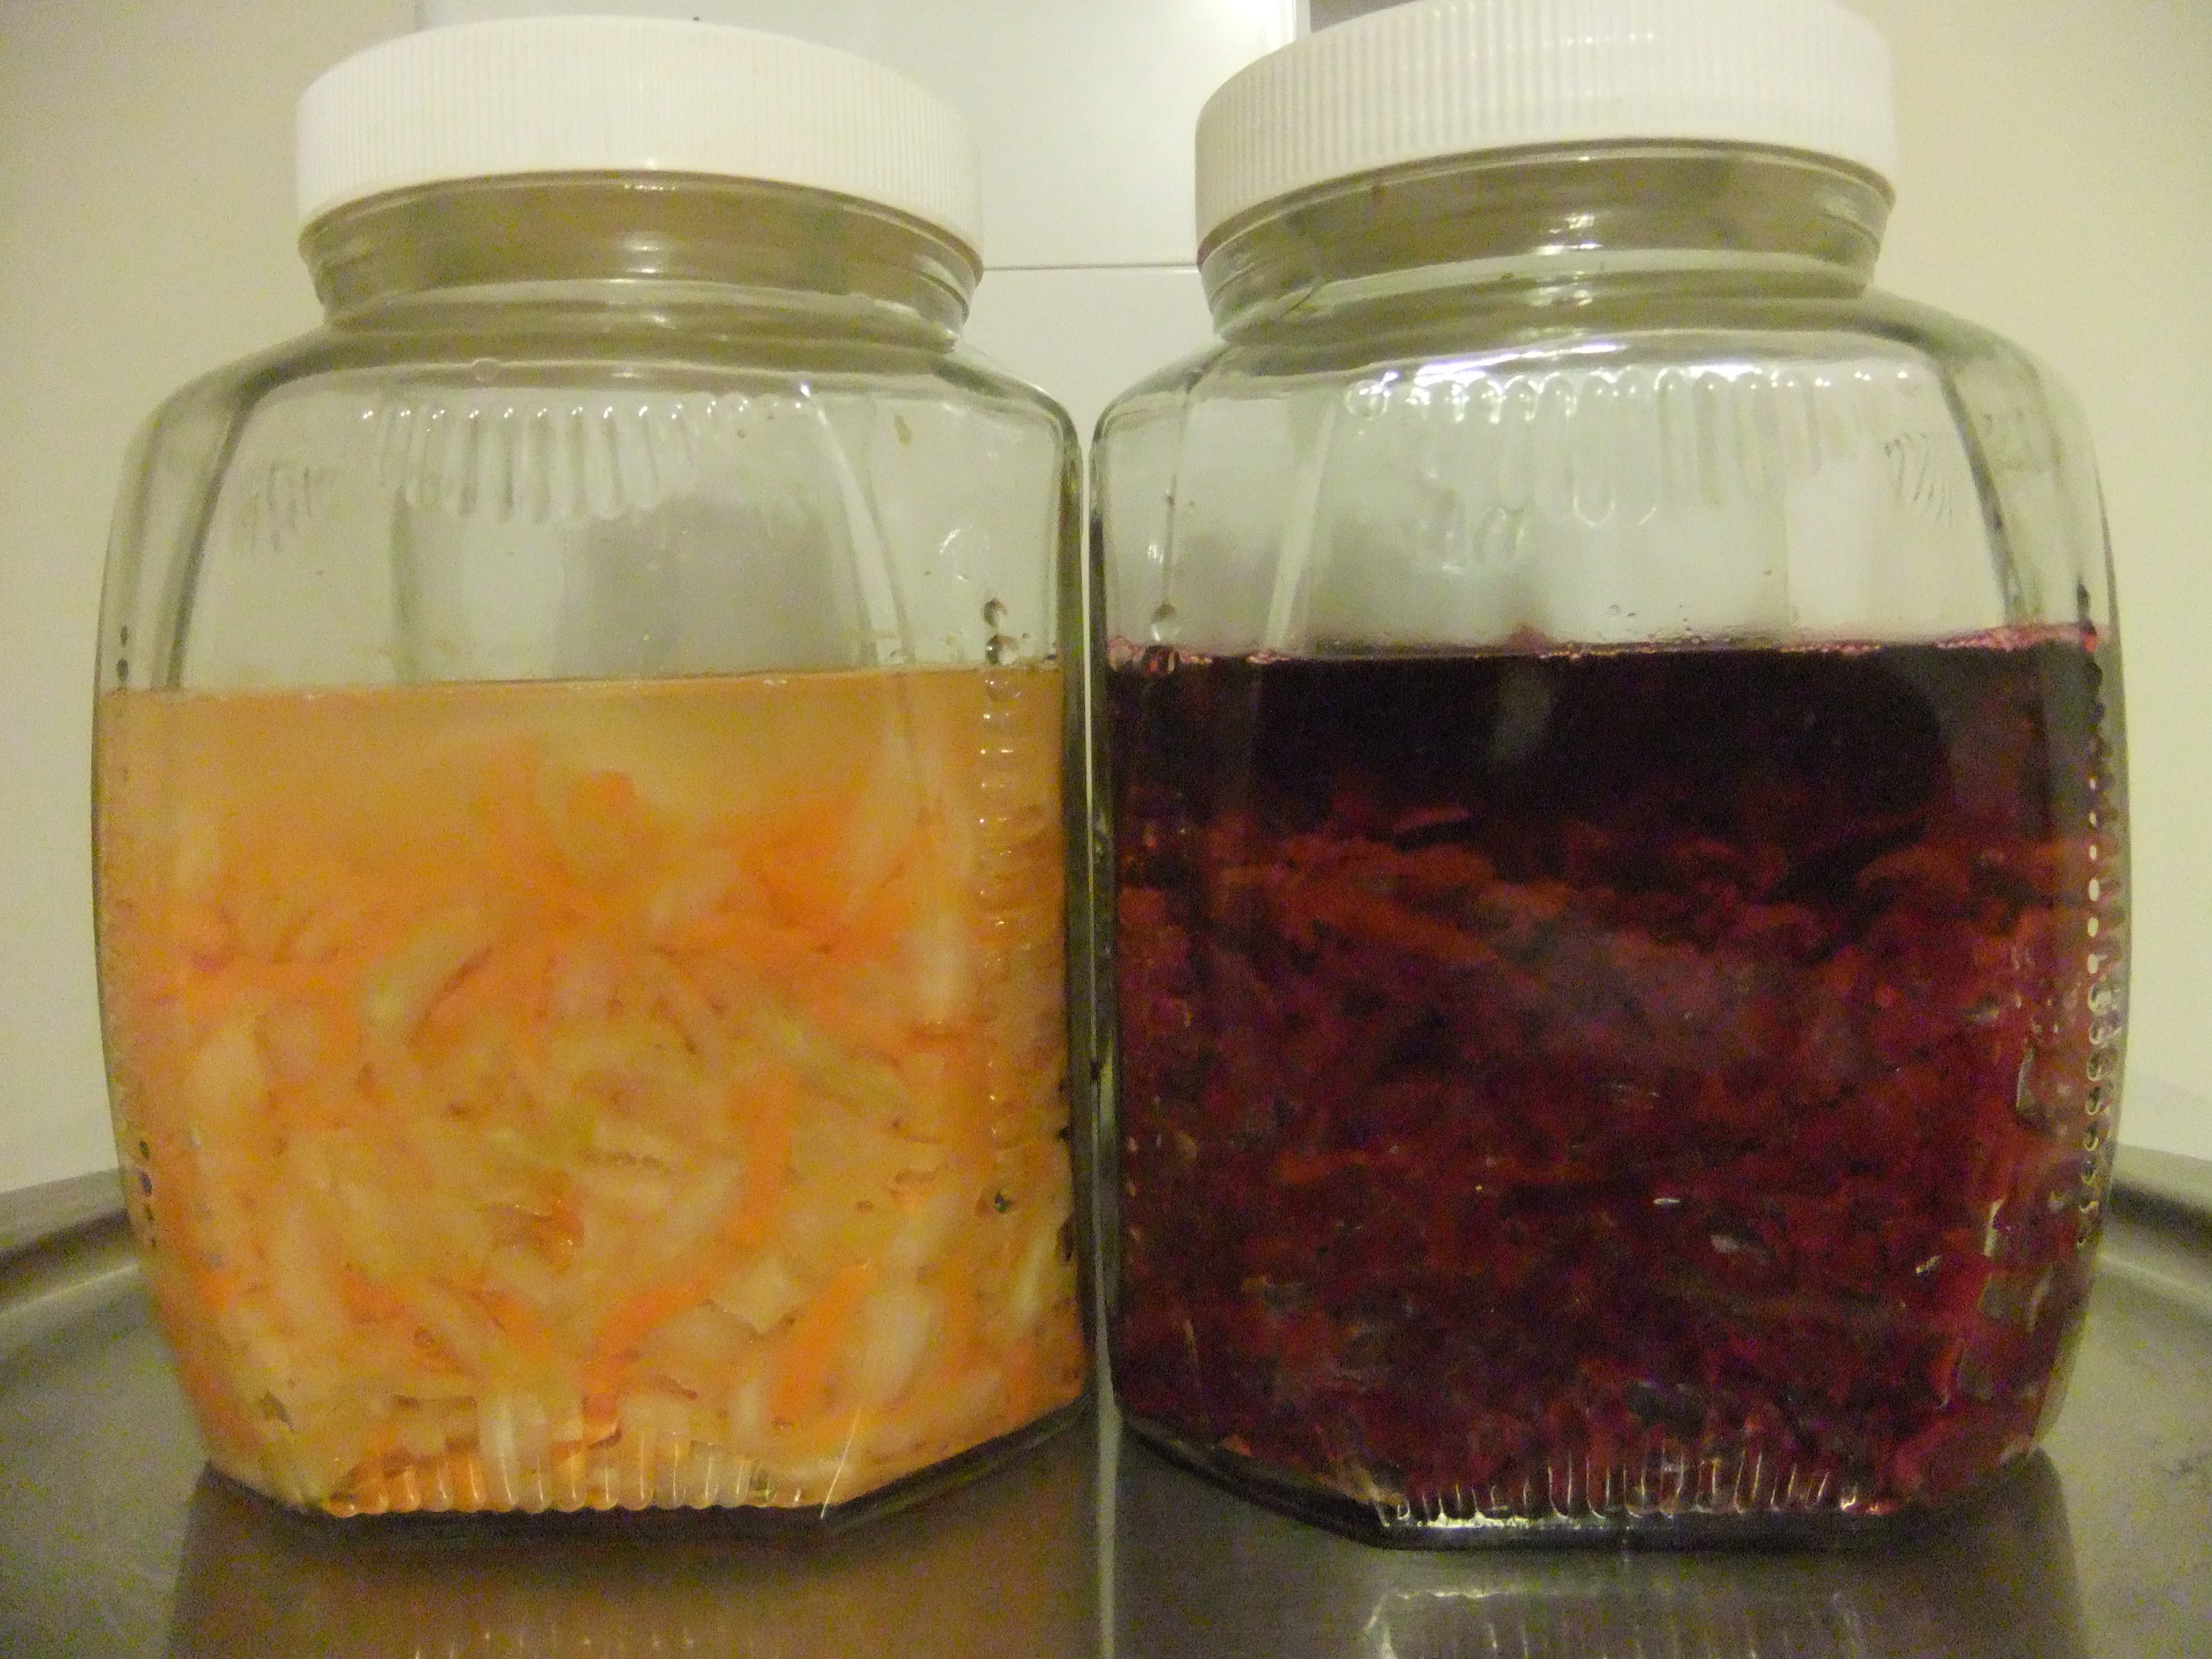
- While air is a no-no for the fermentation process as it allows bacteria and mould to grow, you may have to screw the lid on loosely if there is only a small space between the vegetables and the top of the jar to allow any gases to escape. You may even need to pour out some brine if it overflows. This didn’t happen to me as my jars were larger than the recommended quart size and I had plenty of room for bubbling and rise and fall of brine.
- Next, put your jars on a tray to catch any overflow, and then place it all in a spot with a fairly even temperature. The ideal is between 18-23 degrees Celsius or 65-75 degrees Fahrenheit. The brine will rise and fall with the temperature. Note that the higher the temperature, the quicker the fermentation.
- If you’ve never done it before, watching it all is very exciting. During the first week is when the bubbling happens. After that, it settles down. Just make sure the cabbage mix is completely immersed in brine. If you notice the level of brine has fallen below the vegetables, dilute a tablespoon of salt in 2 cups of water and pour some over until the mixture is just covered.
- If you see any mould, throw it all out immediately and start again. It’s never OK to scrape it out and keep going as many recipes recommend. There is more to mould than just what you see.
- Start checking your fermentation for flavour after the first week. You can begin eating it anywhere from one week to four weeks. I decided to let mine go for five weeks. The longer it goes, of course, the more beneficial bacteria you will have. Once you are satisfied with the flavour, take the little jar and the paper out or the large cabbage leaves out, label it and put it in the fridge to stop the fermentation process. It keeps for a very long time, but it’s so delicious, it definitely won’t last for a very long time.

- Once you are comfortable making it you can begin to get a bit creative by adding different vegetables and flavours such as horseradish, turmeric, beetroot, ginger, fennel, hot peppers, onions, leeks, fresh herbs, raisins, currants, cinnamon, allspice, and lemon juice.
How to Eat Sauerkraut
And when it’s all done, it’s time to start eating it. The lovely tangy flavour goes with just about everything. It’s great in salads ~ really good if you add raisins as well. Also in hamburgers, hotdogs and sandwiches ~ goes very well with cheese, egg or tuna. It’s also delicious mixed with cooked vegetables, with an omelette as below, as a topping to soups, stews or pizzas, with sausages, added to Japanese nori roll fillings, or just as a condiment on your plate with a meal.

So enjoy, and if you try any fabulous new varieties, please let me know in the comments below!
♥ Inara Hawley © 2016

Hardware stores are exciting but not that much!!!!! What a shock. Sounds like everything now under control but it’s never easy at the time. Just thank goodness he is ok and your blood pressure is now under control. (Below is a bone broth recipe which is fantastic and I use it for everything. Cook everything in it, but I’m sure you know about bone broths.) John not doing too well. We went on a family holiday and it was out of his comfort zone so ended up having a very bad fall. Just gone down another level. Very slow. We might drop in over winter if John is up to travelling and your up to having visitors. Will talk soon. Johns message to Ted is keep plugging, he can understand what your going through. Love John & Susie
It’s long sorry
BONE BROTH You are here: Home » Blog » Recipes » Beef » How to Make Bone Broth How to Make Bone Broth Katie – Wellness Mama 951 Comments Affiliate Disclosure
If you aren’t already making bone broth regularly, I’d encourage you to start today! It is an incredibly healthy and very inexpensive addition to any diet and the homemade versions beat store bought broth in both taste and nutrition (although there is some amazing homemade organic broth you can buy pre-made now).
This is the one nutrient rich food that anyone can afford to add!
What is Broth? Broth (or technically, stock) is a mineral rich infusion made by boiling bones of healthy animals with vegetables, herbs and spices. You’ll find a large stock pot of broth/stock simmering in the kitchen of almost every 5-star restaurant for its great culinary uses and unparalleled flavor, but it is also a powerful health tonic that you can easily add to your family’s diet.
Broth is a traditional food that your grandmother likely made often (and if not, your great-grandmother definitely did). Many societies around the world still consume broth regularly as it is a cheap and highly nutrient dense food.lllok
Besides it’s amazing taste and culinary uses, broth is an excellent source of minerals and is known to boost the immune system (chicken soup when you are sick anyone?) and improve digestion. Its high calcium, magnesium, and phosphorus content make it great for bone and tooth health. Bone broth also supports joints, hair, skin, and nails due to its high collagen content. In fact, some even suggest that it helps eliminate cellulite as it supports smooth connective tissue.
It can be made from the bones of beef, bison, lamb, poultry, or fish, and vegetables and spices are often added.
Why Broth? Anyone who has read Gut and Psychology Syndrome knows the many benefits of bone broth and how it can improve digestion, allergies, immune health, brain health, and much more.
What isn’t as well know is that broth can help reduce cellulite by improving connective tissue, increase hair growth/strength, improve digestive issues and remineralize teeth.
Broth is also helpful to have on hand when anyone in the family gets sick as it can be a soothing and immune boosting drink during illness, even if the person doesn’t feel like eating.
Broth is very high in the amino acids proline and glycine which are vital for healthy connective tissue (ligaments, joints, around organs, etc). The Paleo Mom has a great explanation of the importance of these two amino acids:
In addition, glycine is required for synthesis of DNA, RNA and many proteins in the body. As such, it plays extensive roles in digestive health, proper functioning of the nervous system and in wound healing. Glycine aids digestion by helping to regulate the synthesis and of bile salts and secretion of gastric acid. It is involved in detoxification and is required for production of glutathione, an important antioxidant. Glycine helps regulate blood sugar levels by controlling gluconeogenesis (the manufacture of glucose from proteins in the liver). Glycine also enhances muscle repair/growth by increasing levels of creatine and regulating Human Growth Hormone secretion from the pituitary gland. This wonderful amino acid is also critical for healthy functioning of the central nervous system. In the brain, it inhibits excitatory neurotransmitters, thus producing a calming effect. Glycine is also converted into the neurotransmitter serine, which promotes mental alertness, improves memory, boosts mood, and reduces stress.
Proline has an additional role in reversing atherosclerotic deposits. It enables the blood vessel walls to release cholesterol buildups into your blood stream, decreasing the size of potential blockages in your heart and the surrounding blood vessels. Proline also helps your body break down proteins for use in creating new, healthy muscle cells.
What Kind of Broth? Homemade, nutrient dense bone broth is incredibly easy and inexpensive to make. There is no comparison to the store-bought versions which often contain MSG or other chemicals and which lack gelatin and some of the other health-boosting properties of homemade broth.
In selecting the bones for broth, look for high quality bones from grass fed cattle or bison, pastured poultry, or wild caught fish. Since you’ll be extracting the minerals and drinking them in concentrated form, you want to make sure that the animal was as healthy as possible.
There are several places to find good bones for stock:
Save leftovers from when you roast a chicken, duck, turkey, or goose (pastured) From a local butcher, especially one who butchers the whole animal From local farmers who raise grass fed animals (ask around at your local Farmer’s Market) Online from companies like US Wellness Meats (also where I get grass fed Tallow in bulk- they sell pre-made high quality broth) or Tropical Traditions (I order high quality beef, bison, lamb and chicken bones from them at good prices) This recipe for broth is my favorite and is an adaption of the recipe in Nourishing Traditions.
Bone Broth Ingredients 2 pounds (or more) of bones from a healthy source 2 chicken feet for extra gelatin (optional) 1 onion 2 carrots 2 stalks of celery 2 tablespoons Apple Cider Vinegar Optional: 1 bunch of parsley, 1 tablespoon or more of sea salt, 1 teaspoon peppercorns, additional herbs or spices to taste. I also add 2 cloves of garlic for the last 30 minutes of cooking. You’ll also need a large stock pot to cook the broth in and a strainer to remove the pieces when it is done.
Bone Broth Instructions The first step in preparing to make broth is to gather high quality bones. As I said, you can find them from sources listed above or save them when you cook. Since we roast chicken at least once a week, I save the carcass for making broth/stock.
I usually aim for 2 pounds of bones per gallon of water I’m using to make broth. This usually works out to 2-3 full chicken carcasses. If possible I’ll also add 2 chicken feet per gallon of water (completely optional!).
You’ll also need some organic
vegetables for flavor. These are actually optional but add extra flavor and nutrition. Typically, I add (per gallon of water and 2 pounds of bones):
1 onion 2 large carrots (if from an organic source, you can rough chop and don’t need to peel) 2 celery stalks, rough chopped
I also add, per batch, a bunch of parsley from the garden. Since I make in bulk, I usually use about 4 times the amount of each of these. You can make in any amount, just multiply or divide the recipe up or down.
If you are using raw bones, especially beef bones, it improves flavor to roast them in the oven first. I place them in a roasting pan and roast for 30 minutes at 350.
Then, place the bones in a large stock pot (I use a 5 gallon pot). Pour (filtered) water over the bones and add the vinegar. Let sit for 20-30 minutes in the cool water. The acid helps make the nutrients in the bones more available.
Rough chop and add the vegetables (except the parsley and garlic, if using) to the pot. Add any salt, pepper, spices, or herbs, if using.
Now, bring the broth to a boil. Once it has reached a vigorous boil, reduce to a simmer and simmer until done. These are the times I simmer for:
Beef broth/stock: 48 hours Chicken or poultry broth/stock: 24 hours Fish broth: 8 hours During the first few hours of simmering, you’ll need to remove the impurities that float to the surface. A frothy/foamy layer will form and it can be easily scooped off with a big spoon. Throw this part away. I typically check it every 20 minutes for the first 2 hours to remove this. Grass-fed and healthy animals will produce much less of this than conventional animals.
During the last 30 minutes, add the garlic and parsley, if using.
Remove from heat and let cool slightly. Strain using a fine metal strainer to remove all the bits of bone and vegetable. When cool enough, store in a gallon size glass jar in the fridge for up to 5 days, or freeze for later use.
>
Thanks for your comment honey. I’ve replied in an email to you. XX
Dear Inara, I had to laugh when I got this musing! Having only recently returned from Austria and having tried Sauerkraut for the first time! I must say it didn’t go down well with me! The dish that I selected was Sauerkraut with savoury dumplings filled with minced meat – when the plate arrived it looked like a pale skinned lady floating nude on her back in a very polluted pond!! I think also, they cut back on the meat (about a teaspoon full in each boob!) Oh well – I tried it but will never eat it again, although you say it is really good. Perhaps you grew up with it, and your grandma’s was to your taste, though they don’t always get it right – my grandma used to cook cows udder in the war years, and I never came to enjoy that! It was pale cream in colour with blue veins! Very good for you she said. I do enjoy your musings, and wonder what triggers your mind for the subjects – just keep ’em coming! As I write this for you, I am wondering how Ted is. How worrying it must have been for you, but so lucky to get a warning and be able to work on it. I am sure with your care he will cope and know what his limitations are. Well, my coffee break to write this must end now, as I have to do some gardening whilst the sun is out- rain is forecast for later in the day. My love to Ted. Keep in touch – love Anne ‘
Sent from my iPad
>
Thanks for your comment Anne. Raw sauerkraut is generally eaten as a condiment or sprinkled through salads, in sandwiches etc., and adds a lovely salty tangy flavour. When it’s cooked the way my mother cooked it, it’s delicious – it simmers for hours with sugar and bacon, and it’s mouthwateringly good, but I would also say it’s an acquired taste. Either you like it or you don’t. I think you got some very bad sauerkraut! As regards Ted. Unfortunately, he had a very bad fainting episode over Easter after he was out watering the garden in the hot sun which landed him back in the hospital for a few hours. I had to call an ambulance as I couldn’t move him. The end result was a change in medications and he is almost normal now. He was overmedicated to billyo poor man. It’s taken a month to get back on his feet. Anyway, he’s all good now and taking it a lot quieter. No more painting houses and building decks for my boy. I will pass on your good wishes. Cheers! 🙂